Search results

"" - Results: 1213

search.header.categories

Healthy Fryers
Healthy Fryers
Garment Steamers
Garment Steamers

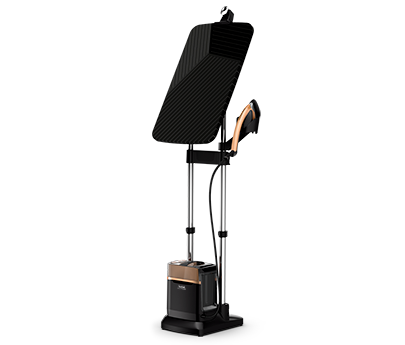
    Discover Tefal’s ranges of garment steamers that provide a new way to take care of your clothes. Each range makes freshening up your clothes quick and easy. So, why not browse through each of our ranges; upright garment steamers and handheld garment steamers to see what suits you best.

Products

FAQS

Before using for the first time:
• Unpack the appliance. The packaging can be recycled, but it may be useful for transporting the oven or returning it to an approved repair centre.
• Put your oven on a stable surface.
• Remove all stickers and protections from the inside and outside of your oven.
• Remove all accessories* from the oven (grill, spit, etc.).
• Clean the oven and accessories with a damp cloth. Dry carefully.
• Close the door by holding the handle only.
• Completely unwind the power cord and plug it into an earthed socket.
• Position the function selector at the "oven" position.
• Set the oven thermostat to max. temperature.
• Set the time for 15 to 20 minutes.
The oven starts up. Some smoke may be released, this is completely normal and will disappear with use.
Any handling of the door must take place by holding the handle.
Before any maintenance or cleaning: unplug the appliance and leave the oven to cool down.
A simple wipe with a sponge is enough to clean the outside of the appliance.
Clean the door, the enamelled or lacquered surfaces and the translucent parts with a damp sponge with a little mild detergent added.
Do not use any aggressive cleaning products (particularly sodium-based strippers), or a scourer or abrasive pad.
To facilitate cleaning, your oven is fitted with:
• Self-cleaning walls* after cooking greasy food, heat your oven while empty, with the thermostat at the maximum position for 10 minutes, with the door closed.
• A grill element that can be folded down but is not removable*.
• A smooth base element that is enamelled or can be lifted* (not removable).
* Depending on model
For stuck-on food, you may use a soft non-abrasive metal pad. Never force the elements when handling them.
All accessories* (shelf, tray, rotary spit kit) can be washed in water with a little detergent added or can be washed in the dishwasher.
• For roasting meat and poultry: use trays with high sides (5 cm minimum) to reduce splashes of grease on the oven walls.
• For pastry, use trays with a non-stick coating to make it easier to turn them out.
To cook meat, fish, gratins, soufflés, pastries, etc:
• Place the shelf at the required height.
• Position the function selector to the oven position.
• Put the tray of food in the oven and close the door.
• Set the thermostat to the required temperature.
• Set the timer.
The oven heats up and stops automatically according to the programmed time. You always have the possibility of interrupting cooking by moving the timer to zero.
Pre-heating is not always necessary (depending on the recipe). The temperature of the door and walls is high when the oven is in operation. Please note, do not place the tray directly on the base element or the smooth base.
To grill and brown all your preparations:
• Preheat your oven.
• Put your tray or meat on the grill as close as possible to the grill element without your food touching the element.
• You can put a tray or the drip tray with a little water directly on the base element or smooth base which does not heat up so that you can collect the grease or juices from the food you are cooking.
• Leave the door ajar (depending on model).
• Position the function selector in the "grill" position.
• Set the required cooking time using the timer.
The oven starts up. For meat, it is necessary to turn the food to be grilled halfway through the cooking time (sausages, etc.).
At the end of the cooking time, if the programmed cooking time has run out, the oven stops automatically, if not, set the timer to zero.
No. Your oven has not been designed to be fitted into a unit. It must be placed on a stable surface that can withstand temperatures of at least 90°C. It is very important to leave space free all around the oven and particularly at the top.
Yes, it is normal for some smoke or a smell to be released the first time you use the appliance. This phenomenon will quickly disappear. The first time, we recommend operating the appliance while empty (without the accessories): set the thermostat to the max. position for 15 to 20 minutes.
If some parts of the appliance catch fire, never attempt to put the fire out with water. Smother the flames with a damp cloth, covering the whole appliance. Unplug the appliance and do not open the oven door.
You must not under any circumstances introduce any materials that run the risk of melting or catching fire in your oven.
• Observe the recommended baking time,
• Favour use of a dark coloured metallic pie tin with an adjustable height, and avoid pie tins made from earthenware, terracotta, porcelain or glass
• Use the correct shelf position: On the middle for a fan-assisted oven and on the bottom for a convection oven,
• Don't use aluminium cooking sheet.
With fan-assisted ovens, avoid glass or earthenware material. Use a baking temperature lower than the recommended one and increase the baking time.
The defrost mode helps speed up the time to defrost food, by stirring the air inside the oven (there is no heating phase during the defrost mode).
The interior lighting only works when the timer function is activated.
The elements do not need to be red to heat. In fact, whether the element turns red depends on the distribution between the heating performance and the length of the element.
The cooking times mentioned in the table are given by way of indication. They may vary depending on the quality of the ingredients and the dishes used. The cooking time therefore needs to be adjusted depending on the food and the cooking utensils used.
The heat is generated by the oven's upper and lower elements. This traditional cooking mode is suitable for cooking meat, fish and puddings.
The heat is generated by the oven's upper element. This can be used for traditional grilling/barbecuing and also to brown dishes.
The heat is generated then blown around by a fan located at the rear of the oven which guarantees exceptionally even cooking anywhere in the oven. The blowing around of the air allowsyour food to be cooked evenly.
The heat is generated by the oven's upper element. The rotisserie accessory rotates to evenly brown your pieces of meat.
The turbo function allows you to cook all your dishes quickly. The heat is generated by higher and lower resistance, to which the fan-assisted function has been added.
This function combines fan-assisted heat and lower resistance, which simultaneously ensures supremely even baking, with a crisp texture to the pastry.
No, you must activate the timer and set the thermostat to switch the oven on.
You can stop the cooking at any time by turning the timer to zero.
After following the instructions in the user manual for starting the appliance, make sure that your electrical socket is working by plugging another appliance. If it still does not work, do not try to dismantle or repair the appliance yourself, instead, take it to an approved repair centre
With Fry Delight, you can prepare dozens of delicious recipes for snacks, dishes and desserts and vary your pleasures every day!
• Meat: you can fry, grill or roast many types of meat in Fry Delight, whether chicken, beef, duck, etc.
• Vegetables: Fry Delight also allows you to grill vegetables such as carrots, courgettes, tomatoes, etc.
• Cakes/tarts/quiches: in Fry Delight, you can also cook cakes, tarts, quiches, or clafoutis by positioning the thermostat at the recommended temperature.
• Frozen food: frozen meals or snacks can also be prepared in Fry Delight. It is recommended to preheat the appliance for 3 minutes before adding the ingredients. It is not necessary to defrost ingredients before preparing them in Fry Delight.
• Crispy chicken nuggets with potato muffins, homemade chips with delicious skewered prawns, choose the dish you desire and follow the recipe with Fry Delight.
You can prepare up to 800g of frozen chips.
Do not exceed the recommended maximum cooking quantities or running times indicated at the risk of not obtaining the desired results and damaging your appliance.
Unlike conventional fryers, it is not necessary to add oil for a crispy and delicious result.
"Air Pulse Technology" allows you to cook food without oil thanks to the optimised circulation of warm air in the appliance.
In addition to frying, Fry Delight allows you to grill, roast and cook to perfection all your favourite dishes, with little or no oil.

Furthermore, since it uses very little oil, Fry Delight does not generate the same smell of frying food as conventional fryers.
Easy to use and clean, Fry Delight is ideal for everyday use.
Fry Delight benefits from "Air Pulse Technology".
This technology involves sending the air flow through a heating element placed above the food, meaning that this flow circulates inside the appliance in an optimum manner.
The use of Pulsed Air Technology enables the preparation of delicious, healthy and crispy dishes.
Ideal for everyday use, Fry Delight guarantees healthy, quick and easy cooking.
With Fry Delight, it is possible to fry, but also grill, roast and oven bake, a multitude of dishes, with little or no oil!
You will find dozens of delicious recipes for meals, snacks and desserts in our digital recipe books on www.tefal.com.
Developed exclusively by a Chef for Fry Delight, these recipes will inspire you to vary your everyday pleasures!
Crispy chicken nuggets, muffins, homemade chips with delicious skewered prawns, choose the dish you desire and follow the recipe with Fry Delight.
The table below will help you to set cooking times according to the food you want to prepare.
The settings are provided as an example and may vary according to the variety of potato used.
For other ingredients, the size, shape and brand may modify the cooking results.
That is why you may have to adapt the cooking time slightly.
The indicated cooking times are based on a preheating time of 3 minutes.
FAQ 1268
Preheating Fry Delight is optional and takes about 3 minutes.
To preheat Fry Delight, set the timer to slightly more than 3 minutes.
When the heating indicator switches off, fill the basket and set the timer to the required cooking time.
You can also place the ingredients in the basket immediately, without preheating; in this case, cooking time will be 3 minutes longer.
Shaking the food in the basket allows warm air to reach contact zones between the food and obtain a more even cooking.
Your food will be crispy and will have an attractive colour for an even more delicious result.
For an even cooking result, we recommend shaking the food in contact with each other or spread out in more than one layer in the basket (chips, nuggets, etc.) half-way through the cooking process.
For fragile food, place the food in the basket in a single layer because shaking it half-way through the cooking process may damage it.

When you shake the basket, check the colour of the ingredients as well.
To shake the ingredients, remove the basket from the appliance by the handle. Remove the basket from the pan. Shake it over the pan and check that the food is well mixed. Put the basket and pan back in the appliance.
Continue cooking.
Yes, you can use greaseproof paper or aluminium foil in your Fry Delight appliance.

However, never completely cover the bottom of the basket with these types of paper or any others. Proper air circulation in the basket will ensure optimum cooking of food. When the bottom of the basket is obstructed, the air flow circulating in the basket is reduced. This modifies your appliance's cooking performance.

Recommendations and rules for using greaseproof paper or aluminium foil in Fry delight:

- Never put greaseproof paper or aluminium foil in the appliance without putting food on it. The greaseproof paper/aluminium foil may be sucked into the heating block and burn.
- Also ensure that the greaseproof paper or aluminium foil used only slightly exceeds the surface area of the food you are cooking.
- You may use greaseproof paper in a tin provided that it only exceeds the edges of the tin slightly. The paper should never exceed the edge of the basket.
- You may use aluminium foil or metal trays in the appliance. Use as little aluminium foil as possible and ensure that there is enough space around the food so that air can circulate around it better.

Do not put greaseproof paper or aluminium foil at the bottom of the pan where grease and cooking residues are collected. This would disturb the air flow in the basket and the cooking process would not be optimal.
Dishes designed for conventional ovens are compatible with Fry Delight.
Materials: you may use dishes in stainless steel, aluminium, cast-iron, terracotta and silicone, as well as glass dishes designed for use in an oven.
Dimensions: round dishes with a maximum diameter of 16.5 cm and square dishes with sides measuring no more than 14 cm may be used in Fry delight.
It is best that the appliance be allowed to cool down before it is stored away.
Make sure your appliance is unplugged.
Leave to cool for one hour after use before storing away.
You may speed up the cooling process by removing the pan and basket from the appliance.
Caution, the pan and basket are very hot after use. Place them on a suitable heat-resistant surface.
Yes, Fry delight is fitted with rubber feet so that it can placed on a worktop.

However, be careful when removing the pan from the appliance after preheating or cooking. It is very hot and does not have support feet, therefore, the pan will be in direct contact with the worktop.

Recommendations and rules for using the hot pan on a worktop:
- If your worktop is made with a heat-sensitive material, such as laminated wood, we recommend placing the pan on a trivet or an insulating oven glove.
- If your worktop is made with a heat-resistant material, such as marble or metal, you can place the pan directly on it.
The pan and basket are dishwasher-safe.

Tip: If dirt adheres to the basket or the bottom of the pan, fill the pan with warm water and dishwashing liquid. Put the basket in the pan and leave the pan and the basket to soak for about 10 minutes. In this way, food residue will loosen and will be easier to remove. The removal of food residue and fat depends on the quality of your detergent. Ensure that you use a detergent that can dissolve oil.

If grease marks remain in the tank or basket and you are unable to remove them with a suitable detergent, use a degreaser product. Follow the instructions on the packaging.

The coating of the pan and the basket is non-stick. Do not use metal kitchen utensils or abrasive cleaning products to clean them because they may damage the non-stick coating.
Unlike a conventional fryer, Fry Delight is not filled with oil. The outside of the appliance is not greasy after use.

Cleaning recommendations and rules:
- Never immerse the body of the appliance in water because it contains electrical components and elements and never place it under the tap.
- Wipe the outside of the appliance with a damp cloth.
- Clean the inside of the appliance with warm water and a non-abrasive sponge.
- Clean the heating element with a brush to remove food residue.
The pan and basket are dishwasher-safe.

Tip: If dirt adheres to the basket or the bottom of the pan, fill the pan with warm water and dishwashing liquid. Put the basket in the pan and leave the pan and the basket to soak for about 10 minutes. In this way, food residue will come unstuck and will be easier to remove. The removal of food residue and fat depends on the quality of your detergent. Ensure that you use a detergent that can dissolve oil.

If grease marks remain in the tank or basket and you are unable to remove them with a suitable detergent, use a degreaser product. Follow the instructions on the packaging.

The coating of the pan and the basket is non-stick. Do not use metal kitchen utensils or abrasive cleaning products to clean them because they may damage the non-stick coating.
The pan and basket are dishwasher-safe.

Tip: If dirt adheres to the basket or the bottom of the pan, fill the pan with warm water and dishwashing liquid. Put the basket in the pan and leave the pan and the basket to soak for about 10 minutes.

You can use a degreasing liquid to remove any remaining dirt. Clean the pan and the basket in warm water with dishwashing liquid and a non-abrasive sponge.

Rules for use:
- Never immerse the body of the appliance in water because it contains electrical components and elements and never place it under the tap.
- Wipe the exterior of the appliance with a damp cloth.
- Clean the inside of the appliance with warm water and a non-abrasive sponge.
- Clean the heating element with a brush to remove food residue.
Small marks may appear in the pan of the appliance following accidental contact with the coating (for example, when inserting the basket and/or when cleaning the appliance with aggressive products).
If this is the case, we inform you that this is not dangerous because all the materials used have been designed not to pose a risk for food.
During cooking, ingredients with a high fat content release their excess grease or oil at the bottom of the pan. If this oil is heated it may produce white smoke. This has no effect on the appliance or the final result.

To stop the white smoke, follow the steps below:

- Switch off the appliance by turning the timer button to zero.
- Put on gloves to protect your hands.
- Take out the pan and remove the basket. Meanwhile, place the basket on a plate. You can cover the basket in order to maintain a maximum of heat inside the basket.
- Remove the excess oil at the bottom of the pan. Use paper towels to do this.
- Place the basket back in the pan and slide the pan into the appliance.
- Continue cooking. Adjust the cooking time according to the remaining preparation time.

To avoid white smoke, follow the instructions below:

- Avoid preparing food with a very high fat content, such as sausages or other fatty meats.
- When you buy snacks, read the label for details about their fat content. Whenever possible, opt for snacks with a low fat content. It will be difficult to obtain a crispy result with snacks with a high fat content.
- Clean the pan immediately after preparing food with a high fat content.
- Put on gloves and remove the excess oil at the bottom of the pan. Use paper towels to do this.

If you leave the oil to cool, it may condense at the bottom of the pan. In this case, it will be difficult to remove.

If the solution above has not helped you to solve the problem, contact the support service.
It is normal and not dangerous for the outside surface of the appliance to become hot. This is a result of the internal heat being diffused to the outside surface of the appliance during the cooking process.
The manipulation of the handle and the temperature and cooking time setting buttons can be done without any danger while the appliance is heating.

The pan and the basket are very hot while the appliance is working. Caution is advised when handling these elements after the appliance has heated in order not to burn yourself.

After a prolonged period of use, some parts of the appliance will be very hot. The following icon allows you to identify these parts:
FAQ 1282
When you slide the pan into the appliance, you will hear a click that indicates that the pan is correctly in place.

If the pan does not slide into the product easily, check that:
- The basket has been correctly lowered in the pan. When you look at the side of the pan, the basket should not be visible and should disappear completely into the pan.
- The basket has not been filled with ingredients over the MAX level.

If the solutions above have not helped you to solve your problem, contact the support service.
When turning on the Fry Delight, the heating indicator comes on and you should hear the fan running. If, after setting the timer, neither the light indicator nor the fan turn on, check the following points:

- The plug has been inserted correctly in the mains socket.
- You have set the timer to 3 minutes or more. The timer starts the appliance.
- The power socket is working. If several appliances are connected to this socket, try a different socket and check your fuses.

If the solution above has not helped you to solve your problem, contact the support service.
The appearance of bubbles is not serious because the materials used are not harmful for food or for health.
However, if bubbles appear in the pan of your product, contact the support service.
This information is available on the product identification label which can be found on the base (under the appliance).

The product reference can be found at the bottom left of the label (for example: FX1000xx).
The serial number is at the bottom of the label in YYWW format (The last two numbers of the year of manufacturing followed by the week number), for example: 1627 or 1632.

Find this information before contacting the support service for information or to report a problem.
A small release of smoke and a slight odour may be noticed when using the appliance for the first time. This phenomenon is normal and will disappear quickly with use.
Reset the timer by turning it to zero.

Restart the cooking cycle by turning the timer to the desired cooking time. Check that the timer is not blocked.

If the problem persists, contact the support service or visit your nearest approved service centre.
If your timer does not ring at the end of the cooking cycle, check that you have followed the rule for setting the cooking time:

For cooking times of less than 10 minutes, it is recommended to set the timer button to more than 10 minutes, then to set it to the desired cooking time.

If your timer still does not ring at the end of the cooking cycle, contact the support service or visit your nearest approved service centre.
To adjust the cooking time, turn the timer button clockwise or anticlockwise to the desired position.

To stop a cooking cycle, turn the timer button clockwise or anticlockwise to zero. An alarm rings to inform you that you have returned the timer to zero.

Comment:
It may be hard to turn the timer button. There is no danger of damaging the timer when doing this. Hold the timer button firmly and turn it to the desired position.
When turning on the Fry Delight, the heating indicator comes on and you should hear the fan running. If you think that the fan is making a strange noise, contact the support service.
Clean the device with a damp, non-abrasive sponge and washing-up liquid. Do not use any aggressive cleaning agents, scouring sponges or abrasive pads. Do not use any special metal cleaning agents. Never immerse or run the appliance under water.
There could be several explanations:
• The appliance is not properly plugged in.
• You have not yet pushed the power button or you have pushed it incorrectly. Try again by pushing it firmly.
• You have pushed the power button, but the appliance still does not work. Check that the lid is securely closed.
• The engines are running but the appliance does not heat up. Take the appliance to an Authorised Service Centre to have it checked.
Fries or food are not cut evenly. They should be cut to the same size for perfect cooking.
There is no danger in pulling out the basket during cooking, but it is not recommended.
This will lower the temperature inside the device and, for "Smart" recipes, it may disrupt the cooking settings designed for optimal results.
After following the instructions in the user manual for starting the appliance, make sure that your electrical socket is working by plugging another appliance. If it still does not work, do not try to dismantle or repair the appliance yourself, instead, take it to an approved repair centre
Recipes shared by users cannot be uploaded to your device.
However, they can be made in manual mode by following the step-by-step instructions from the app.

However, a selection of the most popular recipes from the community are converted by the brand to make them transferable/downloadable to your device.
Feel free to rate/comment on your favorite recipes in order to give them a better chance of becoming connected!
On some recipes, a small book and a pack name are present. This means that the recipe you have selected is part of a pack.

To download this pack, simply select the pack name.


Click on "Download the pack" at the bottom of the screen.
When you turn on your device, the blue light flashes (waiting for connection) unless you have manually disabled the connect function.

When using your device for the first time, pair it with your tablet/smartphone by following the instructions on your screens, for example, when you step through a recipe.

Alternatively, you can press the central button of the app (central menu icon), then the Bluetooth icon that appears, and follow the instructions on the screen.
1. First try turning your phone's Bluetooth signal off and on again by going through your phone settings or the shortcut bar (top of the phone on Android, bottom on iOS) then return to the app and repeat the pairing operations.

2. If this is not working, you can try turning off and on your phone or tablet and then restart the app and pairing again.

3. If the above steps have not been successful, then you will need to disconnect your device from your tablet/mobile.

On Android:
• Go to Settings on your smartphone, then go to Connections, Bluetooth.
• If you find a device labeled "Blue Cookeo" there, press the wheel and click "Dissociate".

On iOS:
• Go to Settings on your smartphone, then to Bluetooth.
• Make sure that the Bluetooth on your iPhone/iPad is enabled.
• If you find in "My Devices" a device named "Blue Cookeo", press "i" then "Forget this device".

4. Reset your device's Bluetooth pairing table:
• Turn off your device.
• Press the back button on your device while turning it on.
• When starting the device, quickly press the OK button 5 times while holding down the back button.
• A "Enter Code" white screen appears, use the wheel to enter the code 8127 (by pressing OK between each digit).
• Turn the device off.
• Switch the device back on and try to pair it again with the tablet or mobile phone.
After following the instructions in the user manual for starting the appliance, make sure that your electrical socket is working by plugging another appliance. If it still does not work, do not try to dismantle or repair the appliance yourself, instead, take it to an approved repair centre
Battered food should not be put into the basket directly. The batter will wrap around the basket coils and get stuck.
Lower the basket into the oil first. Wearing gloves when placing battered food directly in oil.
The fryer cooks all types of food: vegetables, meat, fish, seafood, fruits. You can prepare desserts with your fryer: fritters, doughnuts, fruit.
Store the oil in the fryer with the lid closed, thereby keeping it fresh and clean. If the fryer will not be used for a long time, store the oil in a separate container and clean the fryer.
Never mix different oils together as each type of oil has a different frying temperature, which can cause the oils to emulsify and boil over during cooking.
• Let the fryer cool completely.
• Pour the oil into a separate container. This is a good time to strain the oil or replace it with new oil.
• Remove the filters and the lid from the fryer (see specific model instructions). The lid should be cleaned with hot soapy water and dried thoroughly. Some lids can be cleaned in a dishwasher (see specific model instructions).
• Change the filter (see specific model instructions).
• The removable bowl (on selected models) should be cleaned with hot soapy water and dried thoroughly. Do not use abrasives. Removable bowls are also dishwasher safe. Do not forget to drain your valve if it is equipped with a filtration system.
• Fixed bowls will need to be wiped out with paper towels to clean out as much oil residue as possible. Never immerse the fryer, cord or plug in water. You can place the fryer in a dry sink and fill the fryer halfway with water and a little washing up liquid. A non-abrasive sponge or kitchen brush can be used to scrub down the inside. Make sure the water does not overflow onto the outside of the fryer or over the heating element.
• Pour the water out and rinse just the inside, dry thoroughly.
• The outside of all fryers can be wiped down with a damp sponge. This is recommended after each use.
The heating time will vary depending on the model and size. Whether you have a fixed bowl model or a removable bowl can make a difference. The average time for all should be between 10 and 18 minutes. The temperature indicator light will be on while the fryer is heating up. The light will go off when the fryer has reached temperature.
Metallic charcoal filters should be changed between 35 to 50 frying sessions, depending on model (the saturation indicator shows when the filter needs to be changed). Foam filters should be changed after 20 frying sessions. If you are frying fish we recommend using a separate filter and changing the oil after use. Waterclean filters made of carbon fibres should be washed after 80 uses (it regenerates after each wash). The Pure Air system is a permanent system that does not need to be replaced.
The oil in your fryer must be changed after 10 uses, as a minimum. Sunflower oil and groundnut oil must be changed after 5 uses or if you hear a popping sound (this means that there is water in the oil). To extend the life of the oil, filter it regularly. You may need to change it more often if frying fish, seafood or battered foods.
Oil should be strained and or filtered (by using paper filters or a filtering pot or a skimmer) after it cools and after each use. This will keep the oil from early contamination. Oil used for fish should be stored separately.
a) The oil is not hot enough. If you have an adjustable thermostat be sure it is set at the proper setting for the food you are cooking. If your unit does not have an adjustable thermostat, be sure the light on the fryer has gone off, this tells you that the oil is ready for frying.
b) Too much food is in the basket. Fry the food in smaller quantities (particularly frozen foods) for better results.
c) You did not cook the food long enough. Increase cooking time by a few minutes, lift basket to check for crispness.
a) The fryer was filled beyond the maximum level (either with oil or with food in the frying basket). Check the oil level. The bowl is marked with a minimum and a maximum level.
b) Wet food has been dropped into the oil. Dry the food completely or remove any loose ice from frozen foods before frying.
Use a fat content recommended for frying. For best results we recommend unsaturated vegetable oil.
Never mix different types of oil in your fryer, they may have different boiling points.
If you use solid vegetable fat:
• cut it into pieces and melt it in a bowl (at 150 °C) before putting it into your fryer.
• never melt solid fat in the basket of your fryer.
Never put solid fat directly into the frying basket.
Unpleasant odours can be due to aged oil and/or a saturated filter that needs to be changed. Change oil or filter or both.
Wipe the window with a little lemon juice or cut a potato in half and wipe this over the window before cooking.
Depending on the model:
a) Exterior Basket Control (allows you to lower food into the hot oil with the lid closed to prevent splashing).
b) Cool Touch Exterior.
c) Sealed Locking Lid with one-touch automatic opening.
d) Your fryer is equipped with thermal limiter to prevent overheating (dry-boil). This limiter is resettable for semi-pro models. If the appliance is not working, check to ensure that the limiter has not been triggered.
After following the instructions in the user manual for starting the appliance, make sure that your electrical socket is working by plugging another appliance. If it still does not work, do not try to dismantle or repair the appliance yourself, instead, take it to an approved repair centre
Standard square cut bread. Remember that stale bread toasts faster than fresh bread. Frozen bread takes longer, depending on model. Your toaster will be fitted with a button for toasting bread from frozen.
The defrost button allows you to defrost your bread and automatically allows extra cooking time for the toast to cook.
A Reheat function on a toaster automatically reduces the toasting time to approximately 30 seconds so that cooled toast can be brought back to temperature, without burning the toast.
The lever will only stay down when your toaster is switched on at the mains socket outlet. If there is still a problem, unplug the toaster and turn it upside down over a sink and gently shake to remove any large crumbs that may be blocking the mechanism. If the problem still persists, take your toaster to an approved service centre.
After following the instructions in the user manual for starting the appliance, make sure that your electrical socket is working by plugging another appliance. If it still does not work, do not try to dismantle or repair the appliance yourself, instead, take it to an approved repair centre
When preparing delicate foods, such as onions, pushing too hard with the food pusher can turn them to a mush.
This is normal when using the Extra Fine Cone when processing very hard texture food like Parmesan cheese.
After following the instructions in the user manual for starting the appliance, make sure that your electrical socket is working by plugging another appliance. If it still does not work, do not try to dismantle or repair the appliance yourself, instead, take it to an approved repair centre
To clean the body of the appliance, first unplug it and use a damp cloth.
To clean the jug, use soapy water or a washing-up liquid.

For easy cleaning, you can use the "Automatic cleaning" program:
• Fill the jug with 1 litre of hot water and 2 or 3 drops of washing-up liquid.
• Press the "Automatic cleaning" program and wait for the program to finish.
• Finish cleaning the jug with a sponge.

The jug, the blade unit without titanium coating and the locking ring are dishwasher safe. They must be disassembled and placed separately in the dishwasher.

CAUTION
• Please do not put the blades with titanium coating in the dishwasher.
• The blades are extremely sharp; handle them with care when using or cleaning the appliance.
Leak through lid (overflow):
• The volume of ingredients is too high, do not exceed the maximum filling level for the jug as stated in the instructions for use.
• The lid is not correctly positioned, lock it securely on the blender jug.
If the lid has a seal, check its condition and change it if necessary.


Leak from the bottom of the jug:
• Check that the removable blade unit is correctly positioned on the jug, it must be correctly inserted in the jug (there must be no gap between the blade unit and the bottom of the jug).

• Check that the seal is positioned the correct way around on the blade unit - the 3 folds of the seal must be visible once it is in place. If it is positioned in the other direction, you will not be able to lock the blade unit on the jug.

• Check the condition of the seal and change it if necessary.
• Check that your jug is not split or broken as a result of impact.

If the leak persists, take the appliance to an approved repair centre.
Yes, the "The Perfect Mix" feature is available for all blenders. You need to create an account and log in to your app to access this feature.
You must create an account and log in to your app to access this feature.

"The Perfect Mix" is a feature dedicated to blenders. Developed with a French Chef, this feature offers you many ideas of combinations with different ingredients.
Choose a fruit or a vegetable, a type of preparation and discover the possible combinations organised in three levels:
  1. Authentic: simple combinations with another fruit or vegetable.

  2. Intrepid: add an extra touch with the addition of a spice, condiment or flavouring.

  3. Velvet: go even further with an extra touch of deliciousness (coffee, chocolate, dairy products, oils etc.).
The application has rich content and requires a stable Wi-Fi connection to download correctly.
If your application does not download correctly, delete it and try to download again when you have a more stable Wi-Fi connection.
During initial installation, the download may take several minutes while the application saves all the photos on your Smartphone or tablet.
After following the instructions in the user manual for starting the appliance, make sure that your electrical socket is working by plugging another appliance. If it still does not work, do not try to dismantle or repair the appliance yourself, instead, take it to an approved repair centre
• You have just refilled the reservoir and changed the "anti-calc" cartridge or you have just begun to use the device. ==> Press and hold the steam button for 2 or 3 minutes, keeping the iron away from your clothing to prime the pump.
• The "anti-calc" cartridge is not installed or incorrectly installed in the appliance. ==> Make sure that the "anti-calc" cartridge is installed and fully engaged in its compartment.
• Steam cannot be created at the temperature you have selected. ==> Adjust the thermostat to the steam zone (••• or to MAX).
• The water tank is empty. ==> Fill the tank.
• You are using the steam function for the first time or you have not used the steam function in some time. ==> Press the steam button on your ironing board until the iron produces steam.
• The setting is not correct (1 point/2 points) and the soleplate is not hot enough to produce steam. ==> Adjust the iron to 3 (••• or MAX) and wait for the iron thermostat light to deactivate before using the steam button again.
The appliance is faulty; stop using your maxi steam iron and contact an Approved Service Centre.
The "anti-calc" cartridge is no longer functioning; replace it and then press the reset button for at least 3 seconds. Then press and hold the steam button for 2 or 3 minutes, holding the iron away from your clothes, to prime the pump.
You did not press the reset button.
Press it until the light stops flashing, then press and hold the steam button for 2 or 3 minutes, holding the iron away from your clothes, to prime the pump.
If the problem persists contact an Approved Service Centre.
You should replace the cartridge when the "anti-calc" indicator light flashes.
Your ironing board is saturated with water because it is not suited for use with an iron equipped with an extra large reservoir.
We recommend using an ironing board made of steel mesh or with holes.
No, it is normal to have noise and vibration when the steam is activated. The use of steam triggers the functioning of an electric pump.
The steam is more or less significant depending on the temperature setting of the iron. We advise you to use steam occasionally when the temperature is set low on the iron, otherwise drops of water could appear on your laundry.
If the temperature of your iron is adjustable (depending on the model), use steam occasionally when the temperature is set low on the iron.
Before cleaning, ensure that the appliance is unplugged and that the soleplate and iron rest plate are cold.
Do not use any detergents or descaling products to clean the soleplate or base unit. Never hold the iron or its base unit under tap water.

• Cleaning the base unit:
Clean the plastic parts from time to time with a soft, slightly damp cloth.

• Cleaning the scale collector:
Wait until the appliance has been switched off for at least 1 hour.
Remove the scale collector by lifting and rotating the flap a quarter turn.
Rinse the scale collector under the tap and put it back on the iron.

• Self-cleaning of the soleplate (depending on model):
When the anti-calc indicator blinks, perform the steps described in this video.
The temperature is set too low on your iron, it does not allow you to have steam.
Yes, this is quite normal. The water flow allows the cleaning of the soleplate interior.
The self-cleaning operation of the soleplate has to be performed. Refer to the chapter "Maintenance and cleaning", "How to descale my steam generator?".
Yes, this is quite normal. The self-cleaning operation causes the electric pump to operate.
Yes, the replacement cartridge may be different from your original cartridge, especially in its connection to the tank. This has no consequence on the operation of your steam generator, the 2 types of cartridge are interchangeable.
After following the instructions in the user manual for starting the appliance, make sure that your electrical socket is working by plugging another appliance. If it still does not work, do not try to dismantle or repair the appliance yourself, instead, take it to an approved repair centre
No, you must not add detergent to the tank.
No, you must not add perfume or essential oils to the tank.
Detach the lid of the dust container and remove the foam filter, throw it away and install the new one.
To clean the head, first detach the wipe holder and then the head from the device body. Pass it under water and use a sponge if necessary. Let it dry completely for 24 hours before reinstalling it.
Replace the foam filter of the dust container every 6 months.
Replace the anticalc filter (located behind the water tank) every 3 months. It is important to respect this 3-month period in order to maintain the durability of your appliance.
You can wash the wipes either with tap water or in the washing machine at 40°C.
Caution: Allow the wipe and its holder to cool down after using the appliance to prevent burns.
Your appliance lets you choose between two steam levels:
- 'Eco' position: for floors such as laminated/varnished parquet, rug/carpet*, stone/marble.
- 'Max' position: for floors such as tiled/vinyl.
* Only for models equipped with carpet glider.

Note: These recommendations should be respected in order to avoid damaging the floors.
• We recommend that you check the floor manufacturer's instructions for use and precautions. It is advisable to test the surface area to be cleaned before starting.
• For soft floor coverings (carpets, rugs), allow the sprayed area to dry first to ensure that no colour change or deformation occurs.
• Your device is not connected to the power supply: check that the power cable is properly connected and that the on/off button is turned on.
• The water tank is empty: fill it.
• The antiscale cartridge is incorrectly installed: reposition it correctly.
• The absorption nozzle is not immersed: shake the water tank to immerse the nozzle.
• The dust container is full: empty it.
• The filter is missing or incorrectly installed: clean the filter and install it correctly.
You are in 'Max' position. Reduce the steam power.
The wipe is saturated. Clean it.
The portable steam cleaner is not properly connected. Check the condition of the connectors and the proper mounting of the portable steam cleaner.
The wipe is too wet.
Clean it, use the 'Eco' steam position or install a new wipe.
You are using chemical descaling products or additives in the water tank.
Never add any products to the water tank. Contact an Approved Service Centre.
Accessories are clogged or there is no cleaning mode selected.
Change the accessories and select the 'Eco'/'Max' position, then press the steam button.
Limescale builds up on the heating element. Check if the appliance works without the flexible hose and its accessories.
In that case, change the flexible hose and/or its accessories. Otherwise, contact the Consumer Service or go to the nearest Authorized Service Centre.
After following the instructions in the user manual for starting the appliance, make sure that your electrical socket is working by plugging another appliance. If it still does not work, do not try to dismantle or repair the appliance yourself, instead, take it to an approved repair centre

Instructions & Manuals

About us