Search results

"" - Results: 1517

search.header.categories

Healthy Fryers
Healthy Fryers
Garment Steamers
Garment Steamers

    Discover Tefal’s ranges of garment steamers that provide a new way to take care of your clothes. Each range makes freshening up your clothes quick and easy. So, why not browse through each of our ranges; upright garment steamers and handheld garment steamers to see what suits you best.
FAQS

Yes: never rub the heating element with a cloth or any abrasive material. Descaling is quite enough to clean it.
The filter is made up of a grid that retains the particles of tartar. It is important to clean it regularly by brushing it or soaking it in a container with a descaling solution (diluted vinegar or citric acid).
Simply wipe the outside with a clean cloth (with a drop of vinegar if necessary) and descale the inside. Never use abrasive products, scouring powder, detergents or other maintenance products because they may discolour the plastic. Take care never to put the kettle, power cord plug or electrical base in water !
Descale regularly, preferably at least once a month and more often if you live in a very hard water area.
To descale your kettle:
• Use commercial 8° white vinegar:
- Fill the kettle with 1/2 l of vinegar,
- Leave it to act for 1 hour without heating.
• Citric acid:
- Boil 1/2 litre water,
- Add 25 g citric acid and leave to act for 15 min.
• A specific descaling product for plastic kettles: follow the manufacturer's instructions.
Empty your kettle and rinse it 5 or 6 times.
Start again if necessary.

To descale your filter (depending on model):
• Soak the filter in white vinegar or diluted citric acid.
• Never use descaling method other than the recommended one.
Check that the lid of your kettle is closed and the filter is in place.
If so, please take your kettle to an authorised repairer.
In some regions where the water contains high levels of iron, the natural lime deposit inside your kettle may take on a brown or black colour.
This usually happens when the kettle is new; pour away the water from the first few uses. If the problem persists, fill the kettle to its maximum level and add 2 teaspoons of bicarbonate of soda. Boil the kettle, pour away the water and rinse the kettle.
This phenomenon is normal in hard water regions. It is caused by the calcium and magnesium carbonate present in the water.
Tip: regular descaling will be necessary.
During use:
Follow the instructions in the user manual: keep to the filling level and only fill with water
After use:
Always empty the excess water from your kettle
Maintenance:
Descale regularly, at least once a month and more often if you live in a hard water area
• Do not use the kettle with wet hands or if you have bare feet.
• Do not leave the power cord hanging over the edge of a table or work surface to avoid any risk of the kettle falling.
• Always be aware while the appliance is operating, paying special attention to the steam coming out of the spout, which is very hot.
• Also pay attention to the fact that the body of a stainless steel kettle becomes very hot during operation. Do not touch the kettle other than by the handle.
• Children should be supervised to ensure that they do not play with the appliance.
• If the power cable is damaged, it should be replaced by the manufacturer, its after-sales service or a similarly qualified person to avoid any danger.
Generally caused by scale build-up inside: read the instruction leaflet carefully on how to descale your kettle (depending on model).
Alternatively, the kettle may have accidentally been used without water or with insufficient water (an element must always be covered by water), causing the safety cut-off device to operate. Reset in the following way:
Wait 5 minutes for the kettle to cool and then refill with water.
Push the on/off switch and after about 15 minutes the kettle will automatically reset itself and start to boil.
Do not place the kettle near a window as the plastic parts can be discoloured by sunlight.
The 360 degree base must rotate freely.
This can be due to the high efficiency element design which heat the water.
You may have overfilled the kettle causing water to either leak down the outsides of the kettle when boiling or water to get into the internal steam vent which means water will appear at the base of the kettle on the work surface. Only ever fill your kettle up to the Maximum mark. Also the condensation on the lid may have dripped down on to the work surface.
Prior to first use, rinse the interior of your kettle and bring water to a boil once or twice
You can only use water in the product. If you boil liquids other than water, it may result in leakage, spillage or damage.
You can boil mineral water. If there are many minerals in the water, the stainless steel will easily stain (Depending model). We recommend that you periodically clean your kettle.
It isn't a cord-reel type. Please remove and extend the part wound around the plate manually.
Because power consumption is high, it may omit some heat. Use a power plug exclusively for the kettle. If there is enough heat that it could cause a burn or if the plastic is deformed, please stop use, and arrange a repair and inspection.
Electric kettles boil the necessary amount for the necessary time and are not usually equipped with features to keep water warm. It boils water very quickly so there is no need to keep water warm.
The internal parts may make noises with the change in temperature. There is nothing wrong with it.
It may look like there is more space for water, but if you put in over the maximum it was designed for, it may leak when the water boils. Please do not overfill the kettle.
It is depending the kettle size, never use even if the water is below the minimum line on the kettle window.
To reduce water staining and prevent leakage from the kettle tipping over, we recommend that you empty the kettle after use.
Electric kettles are designed to turn off when they sense steam. This steam may condense and drops of water may fall from the bottom of the handle. This is not a fault. It will also not cause any fault with your kettle.
Immediately after boiling, the sensor that automatically turns the power off will be hot, and the power switch may not operate. Wait until the sensor has cooled and then try again.
Kettle filters and filter holders are made of food-grade polypropylene (PP).
The heating element is made of food-grade stainless steel (SUS304).
The bodies of plastic kettle are made of food-grade polypropylene (PP).
The bodies of stainless steel kettle are made of food-grade stainless steel (SUS304).
If the resistance or the heating element is scaled, the heat produced is only partially transferred to the water for heating. On the other hand, scale favours the appearance of rust.
This is normal. For LCD screens, an electrostatic phenomenon occurs when the film is peeled off the screen.
The white traces will disappear after a few seconds and there is no risk to the proper functioning of the screen.
We suggest that you remove all film and packaging before plugging in the kettle.
This is normal, the sound comes from the electronic board.
The integrated software manages the On/Off operation of the electronic board periodically when the water temperature exceeds at least 80°C.
Yes: never rub the heating element with a cloth or any abrasive material. Descaling is quite enough to clean it.
The filter is made up of a grid that retains the particles of tartar. It is important to clean it regularly by brushing it or soaking it in a container with a descaling solution (diluted vinegar or citric acid).
Simply wipe the outside with a clean cloth (with a drop of vinegar if necessary) and descale the inside. Never use abrasive products, scouring powder, detergents or other maintenance products because they may discolour the plastic. Take care never to put the kettle, power cord plug or electrical base in water !
Descale regularly, preferably at least once a month and more often if you live in a very hard water area.
To descale your kettle:
• Use commercial 8° white vinegar:
- Fill the kettle with 1/2 l of vinegar,
- Leave it to act for 1 hour without heating.
• Citric acid:
- Boil 1/2 litre water,
- Add 25 g citric acid and leave to act for 15 min.
• A specific descaling product for plastic kettles: follow the manufacturer's instructions.
Empty your kettle and rinse it 5 or 6 times.
Start again if necessary.

To descale your filter (depending on model):
• Soak the filter in white vinegar or diluted citric acid.
• Never use descaling method other than the recommended one.
Check that the lid of your kettle is closed and the filter is in place.
If so, please take your kettle to an authorised repairer.
In some regions where the water contains high levels of iron, the natural lime deposit inside your kettle may take on a brown or black colour.
This usually happens when the kettle is new; pour away the water from the first few uses. If the problem persists, fill the kettle to its maximum level and add 2 teaspoons of bicarbonate of soda. Boil the kettle, pour away the water and rinse the kettle.
This phenomenon is normal in hard water regions. It is caused by the calcium and magnesium carbonate present in the water.
Tip: regular descaling will be necessary.
During use:
Follow the instructions in the user manual: keep to the filling level and only fill with water
After use:
Always empty the excess water from your kettle
Maintenance:
Descale regularly, at least once a month and more often if you live in a hard water area
• Do not use the kettle with wet hands or if you have bare feet.
• Do not leave the power cord hanging over the edge of a table or work surface to avoid any risk of the kettle falling.
• Always be aware while the appliance is operating, paying special attention to the steam coming out of the spout, which is very hot.
• Also pay attention to the fact that the body of a stainless steel kettle becomes very hot during operation. Do not touch the kettle other than by the handle.
• Children should be supervised to ensure that they do not play with the appliance.
• If the power cable is damaged, it should be replaced by the manufacturer, its after-sales service or a similarly qualified person to avoid any danger.
The 360 degree base must rotate freely.
This can be due to the high efficiency element design which heat the water.
You may have overfilled the kettle causing water to either leak down the outsides of the kettle when boiling or water to get into the internal steam vent which means water will appear at the base of the kettle on the work surface. Only ever fill your kettle up to the Maximum mark. Also the condensation on the lid may have dripped down on to the work surface.
Prior to first use, rinse the interior of your kettle and bring water to a boil once or twice
You can only use water in the product. If you boil liquids other than water, it may result in leakage, spillage or damage.
You can boil mineral water. If there are many minerals in the water, the stainless steel will easily stain (Depending model). We recommend that you periodically clean your kettle.
It isn't a cord-reel type. Please remove and extend the part wound around the plate manually.
Because power consumption is high, it may omit some heat. Use a power plug exclusively for the kettle. If there is enough heat that it could cause a burn or if the plastic is deformed, please stop use, and arrange a repair and inspection.
Electric kettles boil the necessary amount for the necessary time and are not usually equipped with features to keep water warm. It boils water very quickly so there is no need to keep water warm.
The internal parts may make noises with the change in temperature. There is nothing wrong with it.
It may look like there is more space for water, but if you put in over the maximum it was designed for, it may leak when the water boils. Please do not overfill the kettle.
It is depending the kettle size, never use even if the water is below the minimum line on the kettle window.
To reduce water staining and prevent leakage from the kettle tipping over, we recommend that you empty the kettle after use.
Electric kettles are designed to turn off when they sense steam. This steam may condense and drops of water may fall from the bottom of the handle. This is not a fault. It will also not cause any fault with your kettle.
Immediately after boiling, the sensor that automatically turns the power off will be hot, and the power switch may not operate. Wait until the sensor has cooled and then try again.
Yes, it could happen that some water splashes, but to avoid splashing we recommend you use a taller cup or you simply lift it closer to the spout.
Yes! You can still use hot water on demand without the filter cartridge. However, if you live in an area affected by hard water, we strongly advises you to use the cartridge in order to provide better tasting, healthier water and to reduce lime scale.
No, the water in the tank comes straight from your cold tap. The cold water goes from the tank to a pump and then is heated instantly.
The minimum temperature of the water is 80°C.
No. The pressure is at a relatively low level.
Your appliance has two safety systems:
• a valve avoids any excess pressure and, in the event of malfunction of the appliance, allows the surplus steam to escape ;
• a thermal fuse to avoid any overheating.
A steam generator is the most powerful iron that generates vast amounts of powerful steam in a separate boiler unit and pumps that steam constantly and consistently through the iron's soleplate straight into the clothes. The benefit is that this halves your ironing time and produces fantastic ironing finishes. A steam station is similar to an ordinary iron but has a larger water tank. The water is pumped up to the iron and the steam is generated in the iron not a separate boiler unit. The steam output is constant but not as powerful as a steam generator.
The formation of lime scale is avoided because the water is not in direct contact with the heating element, which is located outside the tank. However, the tank should be rinsed after 10 uses to avoid lime scale deposits.
Before any maintenance, make sure that the appliance is unplugged and that the soleplate, boiler and iron rest have cooled down (at least 2 hours after ironing).
Do not use any maintenance or descaling product to clean the soleplate or the base unit. Never hold the iron or its base unit under a running tap.
Cleaning the base unit:
• Wipe the plastic parts from time to time using a slightly damp soft cloth.
Maintaining the boiler (once a month):
• Please note: To prolong your boiler's efficiency and avoid scale deposits, you must rinse the boiler every 10 uses (around once a month).
• Check that the generator is cool and has been unplugged for more than 2 hours.
• Slowly loosen the boiler cap. If your generator boiler has an anti-calc rod, take this out and rinse it under the tap before placing it back in the boiler.
• Use a jug to fill the boiler with tap water until it is 3/4 full.
• Shake the base unit gently for a few seconds then empty it completely over the sink.
• For best results, we recommend that you perform this operation once again.
If you live in a hard water area, do this more often. Most of all, do not use any descaling products to clean the boiler as they could damage it.
Tap water:
Your appliance has been designed to work with tap water. If your water is very hard (hardness higher than 30°f or 17°dH or 21°e), mix 50% tap water with 50% distilled water (available in stores).
In some seaside regions, the salt content in your water may be high. In this case, use distilled water only.

Softener:
There are several types of softeners and the water in most of them can be used in the steam generator. However, some softeners, especially those that use chemicals such as salt, can cause white or brown stains. This is particularly the case for filter jugs.
If you experience this sort of problem, we suggest you try using untreated tap water or bottled water.

Remember:
Never use rainwater, pure demineralized water or pure distilled water from shops, or water containing additives (such as starch, perfume or water from other household appliances). Such additives can affect the steam properties and at high temperatures, form deposits in the steam generator chamber, which are likely to stain your laundry and cause premature ageing of the appliance.
Yes this is because the steam is generated in a separate area away from the soleplate of the iron. This allows you to obtain steam on the lowest heat setting, e.g. silks. However, when the iron temperature control is set to the lowest setting you must also set the steam output control dial (depending on the model) to the low position, otherwise water droplets may appear in the steam.
No. When starting or using the steam generator you may hear a pumping or vibrating noise along with a clicking sound. This is completely normal and is just the pump injecting water into the boiler or the steam valve opening.
After rinsing the boiler, you need to press and hold the restart button for about 3 seconds to stop the light flashing.
The anti-scale valve plug may be tightened incorrectly or the seal on the inside of the cap has perished.
Yes. However, if you notice that the steam cord is damaged, have it repaired by an authorised service partner.
No. The two cables are separately insulated; they are protected and rigorously checked. However, if you notice that the cable is damaged, have it repaired by an approved repair centre.
Descaling operation is not needed for the steam generator, nevertheless, you could rinse the boiler every 10 uses (refer to user manual).
Never use any descaling agent or vinegar when rinsing the boiler: they could damage it.
• Models with scale collector: Rinse the scale collector under water. The next time you use your generator, press the "restart" button to turn off the orange "Anti-calc" light (depending on model).
• Models without scale collector: Rinse the boiler. The next time you use your generator, press the "restart" button to turn off the orange "Anti-calc" light (depending on model).
Place the iron's temperature control to the type of fabric to be ironed and set the steam output to match (If the setting temperature control is on Synthetics, the setting steam control must be on MIN).
If the boiler does not operate or the red light on the control panel comes on even though there is still water left in the tank, we suggest you check the water tank is not empty. You can also check the removable water tank (depending on model) is pressed down firmly in place and press the restart button located on the control panel. Also the steam output control dial may be set at minimum (depending on Model); therefore turn the dial up to increase the steam.
If your red water light is flashing there is no water in the water tank or the tank is not fully or firmly pushed down.
This can be due to:
• Trying to use steam before the iron is hot enough. Depending on the model of generator, when ironing on a low temperature, decrease the steam output by adjusting the steam output dial on the control panel. Wait for the iron temperature control light to go out before ironing.
• The water may also have condensed in the pipes because you are using steam for the first time or you have not used it for some time. In which case hold the iron away from the ironing board and press the steam control button until it produces steam.
• Over-use of the turbo steam function can cool down the iron soleplate. In this case stop using the turbo steam function and allow the iron temperature control light to come on and go off again before using this function again.
• The boiler may be too full. Do not fill it right to the top.
The generator's safety mechanism has activated. You need to get the generator checked by an authorised service agent.
The "ECO" function allows you to reduce energy consumption. This means that less electricity is used and therefore slightly less steam is generated.
These functions means that your steam generator is fitted with an electronic regulation which offers you the perfect temperature and steam combination allowing you to iron all your ironable fabrics without risk and without having to sort them.
Do not use your appliance. To avoid any danger, have it replaced by an approved repair centre.
• You are using chemical descaling products or additives in the water. You should never put these products in the water tank. If this is the case, contact an approved service centre.
• Your washing has not been rinsed sufficiently or you are ironing a new item of clothing before washing it. Ensure that you have rinsed your clothes thoroughly in order to to remove soap deposits or chemicals from new garments which could stick to the iron.
• Your iron is too hot, see our recommendations on temperature control settings in your product manual.
• You are using starch. Only spray starch on the reverse of the fabric to be ironed.
The appliance is equipped with an "Auto off" mode, which has been activated.
After 8 minutes of inactivity, the "Auto off" mode is triggered, the ON/OFF button starts blinking, steam is no longer available.
To exit "Auto off" mode, press the ON/OFF button. This will continue to blink for about 2 minutes and then set. The appliance will be ready for use again.
The appliance is equipped with an "Auto off"mode, which automatically stops the product.
After 30 minutes of inactivity, the "Auto off" mode is activated and automatically switches off the appliance. All indicators go out, steam is no longer available.
To restart the product, press the ON/OFF button. This will blink for about 2 minutes and then set. The appliance will be ready for use again.
Yes, this is normal. This is due to the flow of cold water into the boiler that contains hot water.
Tap water:
Your appliance has been designed to work with tap water. If your water is very hard (hardness higher than 30°f or 17°dH or 21°e), mix 50% tap water with 50% distilled water (available in stores).
In some seaside regions, the salt content in your water may be high. In this case, use distilled water only.

Softener:
There are several types of softeners and the water in most of them can be used in the steam generator. However, some softeners, especially those that use chemicals such as salt, can cause white or brown stains. This is particularly the case for filter jugs.
If you experience this sort of problem, we suggest you try using untreated tap water or bottled water.

Remember:
Never use rainwater, pure demineralized water or pure distilled water from shops, or water containing additives (such as starch, perfume or water from other household appliances). Such additives can affect the steam properties and at high temperatures, form deposits in the steam generator chamber, which are likely to stain your laundry and cause premature ageing of the appliance.
After rinsing the boiler, you need to press and hold the restart button for about 3 seconds to stop the light flashing.
Do not use your appliance. To avoid any danger, have it replaced by an approved repair centre.
You can use your iron for up to 30 seconds before recharging it.
The recharging operation on the base takes 10 seconds.

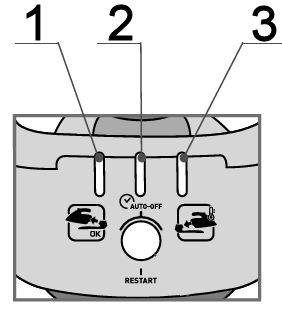
1 - Blinking: Iron on heating phase.
1 - On: Iron ready to use.
2 - Blinking (depending on model): Iron on Auto-off mode (After 8 minutes without any use).
3 - Blinking: Iron need to be recharged.
Do not use your appliance. To avoid any danger, have it replaced by an approved repair centre.
The higher the wattage, the faster the iron will reach the desired temperature.
Do not use your appliance. To avoid any danger, have it replaced by an approved repair centre.
Yes, they are dishwasher safe but it is preferable to wash on the lowest heat setting or prewash setting.
Yes, indeed you can reheat food. Set the timer around 10 minutes (it depends on the food) and make sure that there is enough water in the tank.
Yes, it must be descaled every 7 to 10 uses. To do this, simply fill the water tank with 1/3 white vinegar and 2/3 water.
Leave to act cold for 1 night.
Rinse the inside of the water tank several times with warm water.
Never use abrasive cleaning products.
Over time, the strong coloured natural juices from foods such as carrots and beetroot may stain the juice collector. This is normal. It may be cleaned with lemon juice straight after cooking.
We recommend that you put the largest pieces of food, requiring the longest cooking time in the lowest basket.
The ingredients are very dense and have a different cooking time: try to prolong the cooking time.
Too many ingredients are cooked together: put the larger sized ingredients and the ingredients with a longer cooking time in the lower bowl.
Try to not overload the steam bowls.
Descale your appliance.
Cut the ingredients into small pieces.
The flavour of food is much better in a steamer and therefore any seasoning should be used sparingly.
If required, you can sprinkle it lightly on the food, or add herbs to the steam water to add flavour to your food.
Yes. You should never leave a small electrical appliance unattended whilst in operation. However, you do not have to watch the steamer all the time. Simply set the timer and the bell will let you know when your food is ready to eat. There are no risks of burning the food and no need to stir it.
Caution: Do not forget to put water in the tank.
The appliance has not been descaled after 7 to 10 uses: descale it.
All the juices of the steamed food are collected in the juice collector. This can be used as a basic ingredient for stocks and sauces.
On average, we recommend descaling your appliance every 7 to 10 uses to maintain an effective flow of steam and extend the life of your appliance.
To do this, simply fill the water tank with 1/3 white vinegar and 2/3 water.
Leave to act cold for 1 night.
Rinse the inside of the water tank several times with warm water.
Never use abrasive cleaning products.
No, you can steam all types of food: meat, fish, eggs, potatoes, desserts rice, couscous etc.
If the cooking times are different for the food in each of the bowls, start cooking the food that requires the most time in the lower bowl and then add the upper bowl(s) while cooking is in progress to complete the cooking cycle.
No, the advantage of steam cooking lies in the fact that the flavours of the vegetables are not transmitted to each other, even when they are mixed.
The steam cooker doesn't cook under pressure, it instead uses the ambient pressure.
The steam in the steam cooker is water boiling temperature, approximately 100°C.
All frozen vegetables can be steamed from frozen.
We only recommend using canned or precooked pulses and beans in the steamer. They should be drained and rinsed and then placed in the steamer basket. They do not need to be soaked or boiled first.
Yes, you can steam them in a steamer. They take the same time as if you were steaming/simmering in a saucepan. Just keep checking the water level and topping it up.
Yes - if your steamer baskets have removal bases, then you will be able to remove the bases from baskets 2 and 3 and place a small whole chicken inside the lower of the steam baskets ready for steam cooking.
Yes, to give meat, chicken and fish a delicious moist flavour you can marinate them a few hours before steaming.
For recipes with a long cooking time you will need to refill the water tank during the cooking period. To refill the water tank, you should use oven gloves to lift the lid and steamer basket. Carefully lift and empty any water that has collected in the juice collector, then refill the water tank using cold untreated tap water.
[Check 1] Have you put the water in the right place?
Please put the water in the water tank with the grey part in the middle (the heater).

[Check 2] Did you put enough water in the water tank?
If there is not enough water in the water tank, it won't be able to create steam. Even if just cooking for a short time, you should ensure that the water reaches at least the top of the heater (the grey part). Even if you have put in enough water, it will take some time before it starts steaming.

[Check 3] Is the heater (grey part) dirty?
If there are minerals from the water adhered to the heater, it may not transmit heat correctly and steam may not be created. If there are changes such as discolouration of the heater - brown, black or white - or peeling of the surface, care of the heater will be necessary. Please carry out a descaling.
This is working correctly. The turbo ring surrounds the heater so that the water inside is effectively heated. It is designed so that it doesn't fit flush and the water from the space in between is used to make the steam. Please make sure that the turbo ring is orientated correctly so the notch is facing down.
The surface of the heater isn't peeling. It is probably a film that has attached itself to the surface of the heater. Carry out a descaling.
The cooking time is the same whether you use one or two levels. Please be careful to not pack food too tightly on the first level to ensure that the steam can reach the second level.
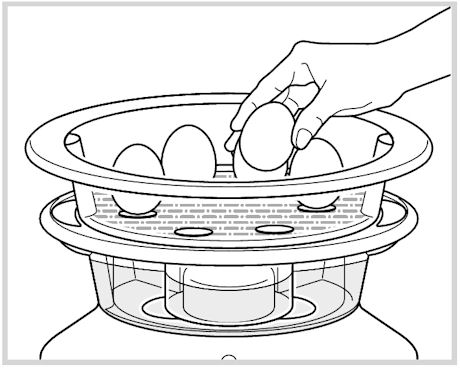
You simply place the eggs in the steamer basket. The cooking time is 12 minutes for 6 hard-boiled eggs, 8 minutes for 6 soft-boiled eggs.
Don't handle the bowls and verrines during cooking and don't touch the device when producing steam; always stop it before.
Do not move the appliance when it contains hot liquids or food.
Always use protective gloves to handle the bowls or verrines after cooking.
When there's not enough water in the tank, the device no longer heats.
Fill it again up to the maximum height mark and the device will automatically restart the cooking programme.
Use gloves and be careful not to touch hot surfaces, or foods being cooked, when refilling the tank.
Try adding fresh herbs, lemon, garlic, oranges or even onion directly to the foods.
To add flavour to chicken, meat and fish made with marinades, use barbecue sauce or spice mixtures.
Yes, but not too often, because this results in a drop in temperature and a loss of steam which can slow down the cooking.
Put the rice in the rice bowl and fill it with water.
Put the rice bowl in the steam basket or in the largest bowl and start cooking.
Yes, especially for recipes with long cooking times.
Also monitor the water level during cooking in case it needs refilling.
Some recipes require the use of cling film for protection, to prevent condensation and protect delicate foods.
Choose a special cling film for cooking, or microwave-safe cling film.
Avoid aluminium foil which tends to increase cooking time.
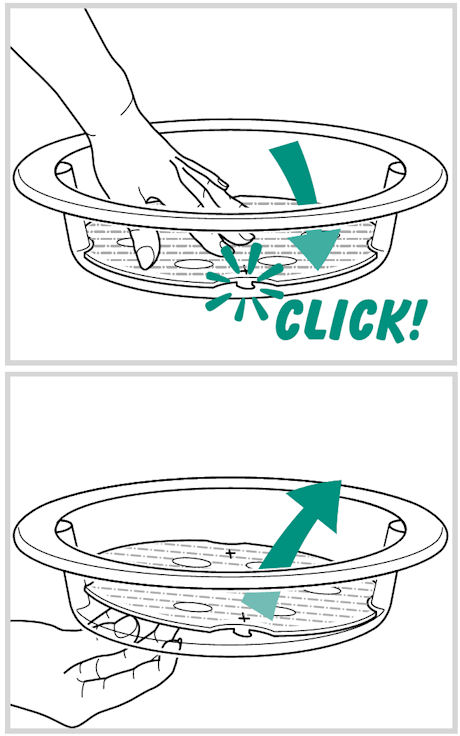
The bowls are equipped with detachable grills, except the drip tray which must always keep its grills.
By removing the grills, you increase the cooking zone to cook bulky foods (whole chickens, artichokes, lobster, cauliflower, broccoli, etc).
To put the grills into position:
• Keep the grill on the correct side (the clip facing down).
• Put the grill into the bowl.
• Press on the clip zone to attach the bowl.
To remove the grills, press on the top of the grill.
You need to press "Menu" first and then keep pressing "Menu" until you get to the program you require. Then press "Start". Also, ensure that the base of the bowl is clean, that there is nothing between the base of the bowl and the element and that the bowl is positioned firmly in place.
The top major sensor has an open circuit or there is a short circuit. You will need to send this to a Authorised Service Centre for repair.
• Check that the opening handle is in the open position before moving the lid to the closed position (green lock).
• Check that the nut of the metal lid is quite tight.
• Check that the violet ball cap (located on the top of the metal lid) is in the correct locked position (closed lock).
• If you are at the end of cooking and you want to close the lid, wait until the hot vapours have dissipated before closing the lid.
• Check for foreign bodies between the bowl and the heating plate. Remove the bowl and check that the heating plate, the central element and the underside of the bowl are clean. Also check that the central element can move freely.
• The bowl may be deformed (after an impact, fall...). The bowl must be changed at an authorised service centre.
• Check that you are not cooking.
• Unplug the product and wait until it cools completely.
• Once the product is completely cool (total absence of internal pressure), insert a rod into the hole located between the opening handle and the silent valve.
• This is normal, the odour will disappear completely after a few uses.
• Be sure to thoroughly clean the items listed in the instructions: cooking vessel, metal lid, before re-using your appliance.
• In the settings, select "Screen/Sounds", then "Screen", "Demo Mode".
• Turn off the demo mode.
• Enter the code 3424 using the scroll wheel.
• Press OK.
• Your device will reboot and return to normal mode. The "Demo" logo has disappeared and your device is ready for use.
You must follow the recommended maximum quantities.
Do not use fruits that become frothy during cooking.
• The quantity of water in the tank is insufficient to increase and maintain the pressure throughout the cooking.
• Stop the ongoing process, open the lid and add a sufficient quantity of water. Restart the recipe or re-heat manually.
• Our tip: When cooking rice and other foods susceptible to high water absorption during cooking, check the instructions on the food packaging carefully and add the minimum amount of water required for cooking under pressure (up to 200ml for maximum quantity/long cooking time).
Always use wooden or plastic utensils. Avoid using metal utensils, particularly knives and whisks.
The dimensions stated on the packaging are usually internal but in all cases a small diagram shows what the dimensions correspond to; you should refer to this diagram to interpret them.
Always use wooden or plastic utensils. Avoid using metal utensils, particularly knives and whisks.
The dimensions stated on the packaging are usually internal but in all cases a small diagram shows what the dimensions correspond to; you should refer to this diagram to interpret them.
Use suitable heat sources. Refer to the instructions for use for heat sources suitability. Models that feature our exclusive Diffusal base work extremely well on all types of cooking surfaces, including induction. Use a hob with a diameter equal to or less than the diameter of the base of the pressure cooker.
If pieces of food get stuck to the side of the bowl (ham, onions, etc.), switch off the appliance, take out the plug, remove the pieces with the help of a spatula, and re-distribute them in the bowl. Plug the appliance in again and pulse 2 or 3 times more. NEVER put your fingers or hands in the bowl, or near the blade.
It is not necessary to remove the skin or peel. You should only peel fruit with a thick, bitter skin, such as lemons, oranges, grapefruit or pineapples (remove the core).
Nor is it necessary to remove the small seeds from watermelon or grapes but you must remove the stones from fruit such as peaches, cherries, etc.
Yes, choose fresh, ripe fruit and vegetables that give more juice.
If you use fruit that is over-ripe, the filter will become clogged more quickly.
Cleaning of the appliance is easier if it takes place immediately after use.
The filter should be pre-cleaned with a soft brush in cold water and handled with care.
All removable parts are dishwasher safe with the exception of the juice collector. The juice collector should be washed in soapy water.
We recommend using it for a maximum of 15 minutes. It is best to leave it to cool down before re-using it.

Instructions & Manuals

About us